Pattern review: Sonia Shorts - Tessuti Sewing Patterns
- Jun 29, 2025
- 6 min read
Updated: Aug 5, 2025
This is my second time sewing this pattern—and for good reason. These shorts are the perfect summer wardrobe staple.

With the warmer weather well and truly upon us here in Munich, it was the perfect time to sew up another pair of Sonia Shorts by Tessuti. This is my second time making this pattern—and for good reason. They’re a quick, satisfying sew with a flattering shape and thoughtful details, making them a go-to in my handmade summer wardrobe.
Here’s my review of my second pair of Sonia Shorts.
Keep scrolling to find out more about...
The makers: Tessuti
Tessuti always brings back fond memories for me. I spent many a day trawling through the racks of their Surrey Hills store in Sydney while studying fashion design.
If you haven’t come across them before, here’s a little overview:
Tessuti Fabrics was established in 1992 in Chatswood, just north of Sydney’s CBD. Its founder, Colette Guanta, comes from a long line of dressmakers and manufacturers, and she studied design herself.
Tessuti has bricks-and-mortar stores in both Sydney and Melbourne, and their products are available online as well as through various international stockists.
They offer not just patterns, but a beautiful range of high-quality designer fabrics, sourced from both Australia and overseas. Their selection is ever-changing, so if something catches your eye, don’t wait too long!
Pattern overview
Design
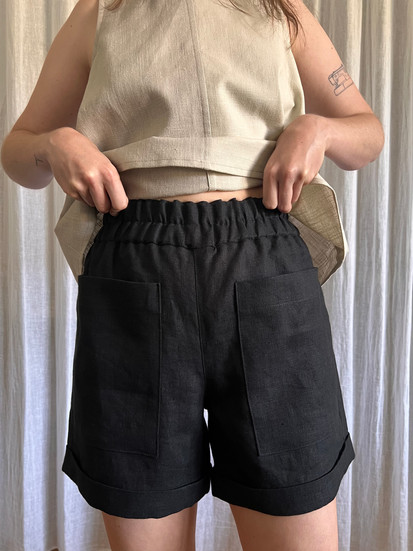
The Sonia Shorts have a wide-leg silhouette and high-waisted fit, blending comfort with a flattering shape.
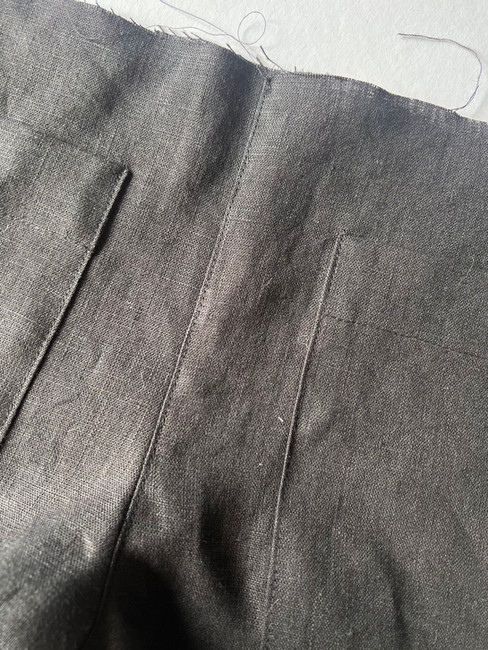
The elasticised paper bag waistband ensures ease of wear, while the front patch pockets add both style and functionality.
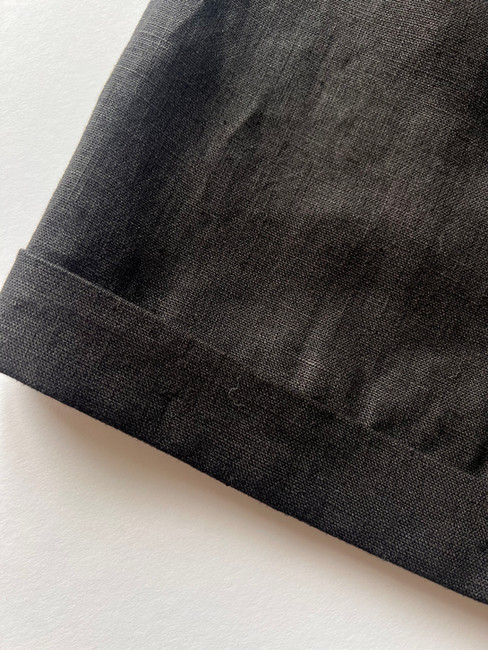
The cuffed hems and topstitching throughout lend the finished garment a polished, well-constructed look.

Skill level
The Sonia Shorts pattern offers a perfect balance—simple enough for beginners yet detailed enough to keep more experienced sewists engaged. With just one view, it's a straightforward and stylish project suitable for all skill levels.
For beginners, it's an ideal introduction to essential techniques like straight stitching, topstitching, sewing patch pockets, inserting an elastic waistband, and creating cuffs. These are perfect for building confidence at the machine.
Sizing
This pattern comes in sizes 6–22, offering a great fit across a wide range of body types.
What's included?
The Sonia Shorts pattern is available in both paper and PDF formats. I picked up a paper copy while I was back home in Australia last year.
The paper version includes:
Copy shop pattern: One A0 sheet
Instruction booklet: 16 pages
If purchasing the PDF (digital) version, you will receive:
Copy shop pattern: One A0 sheet
Print-at-home pattern: 31 A4 pages (includes layout guide and test square on page 1; it's recommended to print this page first to ensure scale accuracy)
Instruction booklet: 16 pages, with clear step-by-step guidance
One thing I really love about Tessuti patterns is that they’re drafted by hand. While some may prefer the precision of digital drafting, I find the hand-drawn style nostalgic and personal. It takes me back to my own pattern making days.
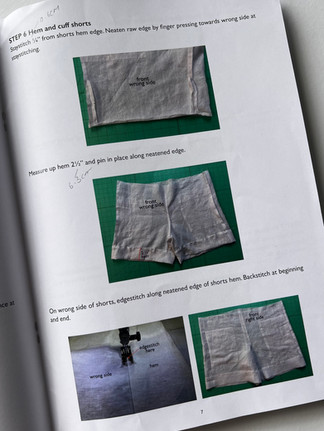
The instructions are broken down into clear, easy-to-follow steps, accompanied by labelled, full-colour photographs (not diagrams). Again, some may prefer a diagram, but I like the use of photographs as they can be clearer and easier to understand.


Fabric and notions
With its clean lines and relaxed fit, the Sonia Shorts pattern is versatile and adaptable to various fabrics, allowing you to achieve different looks depending on your choice.
The pattern suggests fabrics like cotton, linen, linen blends, or medium-weight chambray. A drapier fabric will provide a more fluid silhouette, while a more structured fabric will enhance the shape of the shorts.
You'll need thread and 38mm elastic for the waistband.
For my first pair, I used a 7.5oz cotton/linen denim from Merchant & Mills. This fabric was a bit stiffer than I wanted but still worked well, simply creating a slightly more crisp, structured look.
For my second pair, I chose Merchant & Mills' 100% European laundered linen in Sweeps Scrim (Jet Black), using some leftover from another project. This fabric is part of their 185gsm stock range, made from 100% GOTS and Oeko-Tex certified linen, and measures 143cm wide with a weight of 5.5oz (185gsm).
If you've been following me, you’ll know this is my go-to linen—I wear it year-round here in Munich, simply layering with thermals during colder months. I love the relaxed, lived-in look that linen offers, and this particular one has a beautiful hand feel, washes exceptionally well, and is a dream to cut and sew. I had no doubts it would perform beautifully for a lightweight summer project like these shorts—and it delivered.

If you’re looking for inspiration for your own pair, check out #TessutiSonia on social media to see how others have styled and sewn theirs—it’s a great source of fabric ideas and creative takes on the pattern.
Layout and cutting
As always, I recommend pre-washing your fabric according to the care instructions before you start cutting or sewing.
For more on pre-washing fabric, check out my article 'How to: Pre-wash your fabric'.
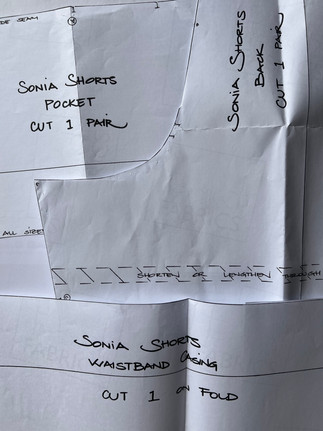
The Sonia Shorts are made up of only four pattern pieces:
Front (cut 1 pair)
Back (cut 1 pair)
Pocket (cut 1 pair)
Waistband (cut 1)
Fabric efficiency
Due to the cuffed hems, the shorts pattern pieces might look larger than expected at first glance (a bit out of proportion).
However, since these are shorts, the overall fabric requirement remains fairly modest.
Cutting was straightforward, though there was a slight zig-zag at the cuff area where the pattern had been trued—just worth noting.
I used a leftover piece of fabric, requiring double the length of the shorts. No pieces need to be cut on the fold, so everything came together easily. You could also top and tail the front and back pieces to make the most of your fabric if working lengthwise.
Need help estimating fabric usage? Check out my guide: "How Much Fabric Do You Need? A Simple Estimation Method."
Fabric preparation
Once your fabric is cut, there isn’t really any prep work you need to carry out for this pattern— I simply recommend like always, make sure you transfer all pattern markings and notches to your fabric using pins, chalk, or your preferred marking method. This is particularly important for the front pocket positioning, and the cuff turn-ups.
Construction
The construction process was really straightforward, broken down into manageable steps that made the experience almost intuitive at times.
The instructions were clear and easy to follow, and the photographic examples were especially helpful in guiding each stage of the process.
Particular attention was needed for the patch pockets to ensure they looked professional, with straight topstitching and accurate positioning being key.
You are required to clip into the fabric at the side seams at the start of the turn up for the cuff. I am not a big fan of snipping into seams, although I understand that it is required at I just find this weakens the seam at times. Since the seams are overlocked closed , a simple workaround would be to overlock the seams open instead. That said, the clipped seam is ultimately enclosed within the cuff, so it's not a major issue.
The cuff construction itself was very straightforward, involving just two simple turn-ups and a simply anchoring stitch at the inner and outer leg seam.


Changes I made while sewing:
The main change I made during construction was to the waistband. The pattern calls for 38mm elastic, but I opted to use 50mm elastic for both pairs. To accommodate this, I simply reduced the depth of the topstitching, which eliminated the pronounced paper bag waist shape. This adjustment worked well, and I simply included one row of stitching through the elastic to keep it securely in place.
Size and fit
My measurements:
Bust: 79cm
Waist: 62.5cm
Hips: 89cm
Height: 155cm
I made a size 6 based on my measurements, and the fit was perfect. The waistband is comfortable and not overly gathered, which can sometimes be an issue with elasticated styles. The length is also spot-on, hitting at mid-thigh — a flattering and wearable length.
I didn’t make any fit adjustments. If you’re between sizes, I’d suggest sizing up, as this style is quite forgiving with a relaxed fit and silhouette.


Personal reflection
Why Did I Choose to Make This?
I was definitely lacking on the shorts front in my wardrobe, and with the weather warming up here in Munich, it felt like the perfect time to sew a new pair. This pattern stood out as an easy make that’s also easy to style — a great throw-on option for everyday wear.
What Did I Love?
I really appreciated the simplicity and versatility of this pattern. These shorts pair well with cropped tops, tucked-in shirts, or loose blouses, making them super flexible. They can easily be dressed up or down depending on the occasion.
What Might I Do Differently Next Time?
Next time, I’d use the correct 38mm elastic as recommended, rather than the 50mm I used. This would help create the intended paper bag waist effect and finish.
Would You Recommend It — and to Whom?
Absolutely! This is a great quick-win project. I’d recommend it to everyone from beginners to more experienced sewists. For beginners especially, it’s a great opportunity to try out a range of techniques while building confidence with garment construction.
Please get in touch or leave me a comment. I would love to know if I have inspired you to check out the Craft Studio Tee from Matchy Matchy Sewing Club.
Thanks for reading.
Emma xx
This is a personal blog. Any views or opinions contained on this site are my own. Unless stated otherwise, I am not affiliated with any brands, products, or organisations mentioned, and do not receive any sponsorship, payment, or other compensation for any of the content on this site.


Comments